Connecting Raspberry Pi Zero (not W) to the Internet
Tuyen D. Le December 11, 2020 [Raspberry-Pi] #Pi-ZeroRaspi Zero (not W) have neither Wi-Fi nor Ethernet, so how could update the raspbian distro?
Well, you can create a virtual Ethernet interface. This method is tested on Window 10, you could get the same idea when using Linux/Mac computer.
Updated June 15, 2023
If you have an USB WiFi dongle (TP-Link-WN725N Nano USB Wifi like I have), the process is much more simpler.
Fisrt, downloading raspberry pi OS (kernel 5.10+) is required, for example 2023-05-03-raspios-buster-armhf-lite
Second, a small configuration needs to be added (thanks to MBing/install_wlan_dongle.sh)
STEP 1: Setup wifi settings
# Add wifi settings
# Search for `auto wlan0` at the start, if it's not there, add it and keep the file open
# Make sure it knows where to find the wpa config
# Add these lines to the bottom of the same file:
STEP 2: Connect to wifi
# The file `wpa_supplicant.conf` might already exist and might have some lines, add these below:
network=
# Replace `YOUR_NETWORK_NAME` & `YOUR_NETWORK_PASSWORD` with your own credentials.
# Reboot and connect
# To test after reboot if your wifi is working, you can open the browser or go to the terminal
# This will now have an ip-address next to `wlan0` which you can use for ssh or whatever.
Preparing
I am testing 2022-01-28-raspios-bullseye-armhf-lite image version.
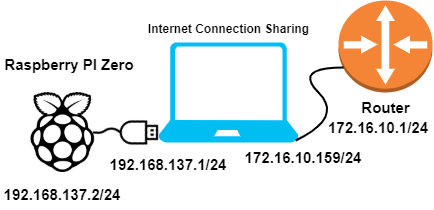
The network topology I'm going to deploy it as follows.

1. Update cmdline.txt and config.txt settings
This method is using libcomposite, so you need to include libcomposite in the modules-load directive as the following. For other methods, please visit gbaman/HowToOTG.md.
console=serial0,115200 console=tty1 root=PARTUUID=22e47bc0-02 rootfstype=ext4 fsck.repair=yes
Add dtoverlay=dwc2 at the end of /boot/config.txt
#
# Omitted
#
# Enable host mode on the 2711 built-in XHCI USB controller.
# This line should be removed if the legacy DWC2 controller is required
# (e.g. for USB device mode) or if USB support is not required.
otg_mode=1
# Run as fast as firmware / board allows
arm_boost=1
# Enable UART
enable_uart=1
dtoverlay=dwc2
2. Script to create a virtual UDC ethernet interface
The script below will create a virtual UDC ethernet interface.
{{< alert icon="👉" text="In order to make Pi Zero to become plug-and-play as much as possible, I am faking IBM Corporation RNDIS Driver on Window because of lacking the Linux Driver on the Window 7. If you are using MacOS/Linux, you should change OS_CONFIG to macos/linux accordingly." />}}
#!/bin/sh
#
# Thanks to
# wismna: http://github.com/wismna/raspberry-pi/hackpi
# RoganDawes: https://github.com/RoganDawes/P4wnP1
# https://docs.microsoft.com/en-us/windows-hardware/drivers/usbcon/enumeration-of-the-composite-parent-device
# https://docs.microsoft.com/en-us/windows-hardware/drivers/usbcon/usb-common-class-generic-parent-driver
OS_CONFIG="window"
IP_SELF="192.168.137.2"
IP_HOST="192.168.137.1"
MAC_HOST="48:6f:73:74:50:43" # "Mac address for host PC"
MAC_SELF="42:61:64:55:53:42" # "MAC address for PiZero"
CONFIG=/sys/kernel/config/usb_gadget/PiZero
||
# 0x04b3 = 1203
# {
# "name": "IBM Corporation",
# "field_vid": "1203"
# },
# Mandatory for Multiple Gadgets
# Ethernet Adapter
#-------------------------------------------
||
{{< alert icon="👉" text="I am using 192.168.137.2 address because when I enable Internet Connection Sharing (ICS) on my Wi-Fi adapter, the second NIC get shared Internet will get 192.168.137.1 as you can see in the following steps. You should change the IP address accordingly to your situation." />}}
Save the file as runme.sh, and don't forget to change its permission to executable file.
In order to get the script run at boot up, one simple way is adding this script into rc.local. See more ways to do this at How to Run a Raspberry Pi Program on Startup.
#!/bin/sh -e
#
# Omitted
#
# Print the IP address
_IP= ||
if [; then
fi
&
If you want to ssh to your PiZero, you could enable SSHD for later use.
It is time to reboot your PI to apply these settings.
3. Window settings for Internet Connection Sharing
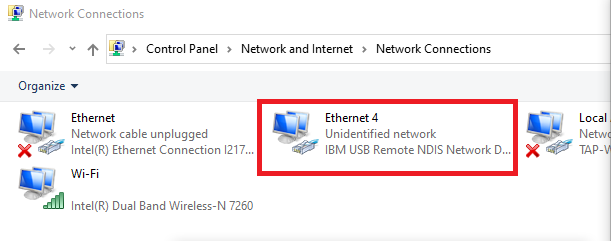
Go to Control Panel\Network and Internet\Network Connections. If everything is good, you should see a new Ethernet Adapter (i.e., Ethernet 4 in my case).

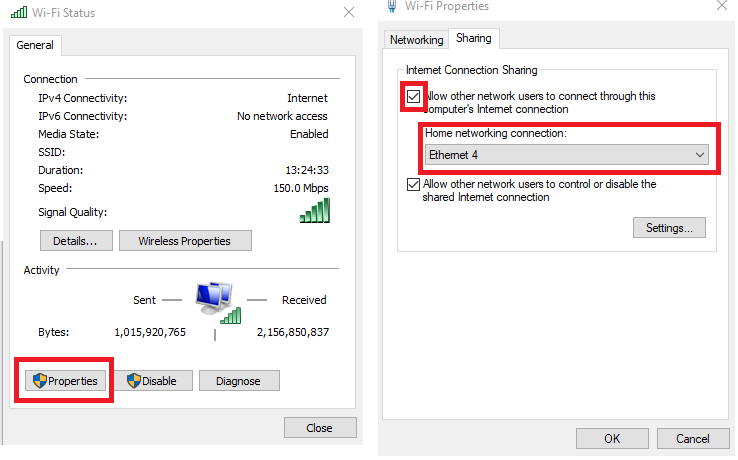
Now, you need to share the Internet from your main NIC to the new created NIC by PiZero.

- Right click on NIC icon choose
Properties, go toPropertiesone more and thenSharingtab. - Check the
Allow Other Network Users ...check box. - Under
Home networking connection, choose the new NIC (i.e.,Ethernet 4in my case) - Click
OK
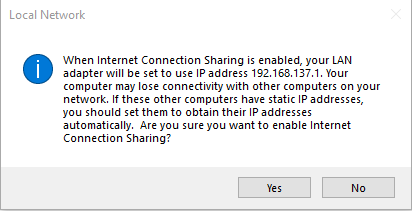
You will see a pop-up states that Ethernet 4 IP address will be changed to 19.268.137.1. That is why I used this IP address in the above runme.sh script.

Try to connect from your PC to your Pi Zero. I am using SSH to connect because I already enabled SSHD service on PiZero.
) )
)
)
In case you have problem with the DNS, try to change the DNS server on PiZero by editing /etc/resolv.conf file.
# Generated by resolvconf
{{< alert icon="👉" text="If it doesn't work, disable antivirus/firewall programs in your computer and try again. You may also need to disable and enable network sharing in your Window computer several times until it works." />}}
Done! Now you could use the Internet on your Pi Zero.